Help centre

Send orders by CSV — any channel

Your own shop, eBay, Etsy, a phone call, a wholesale customer, a sample shipment. One file, any mix of channels, as often as you like. Three steps, and the first one you only do once.

Film

Watch it once, then do it

Twelve minutes on the real screens. For this page the part you need runs from 9:01 — your own CSV, the import template, and running the import. The first four minutes cover the two ways orders can reach us, and how to open the free JTL Fulfillment Network account.

Chapters — 0:00 the two routes · 0:54 FFN Connect · 2:13 the free merchant account · 4:31 the Amazon report · 5:28 the upload and the check run · 7:05 tracking numbers back to Amazon · 9:01 any other channel · 9:49 the import template · 11:18 running the import

Before anything else

The one thing to get right

Read this first: the CSV does not go into the upload form on this site. The form at Send your Amazon orders reads the Amazon unshipped-orders report and nothing else — a CSV uploaded there will be rejected. Your own CSV goes into the FFN portal, under Data exchange → Import → Direct import. It needs a one-time import template first: building it takes about five minutes, or we build it for you.

One-time setup

Building your import template

FFN will not read a CSV until you have told it, once, what your columns mean. It takes about five minutes and you never touch it again. Do this in your own FFN merchant account, at fulfillment.jtl-software.com.
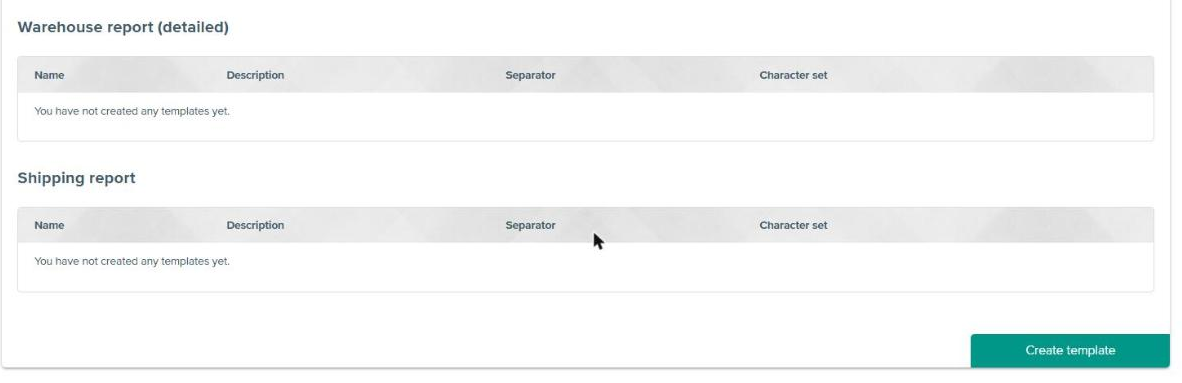
The Template overview page in the FFN portal with the Create template button at the bottom right
1 · Data exchange → Template overview. The page lists your templates grouped by type — item, inbound, sales order, reports. Scroll to the bottom and press Create template.
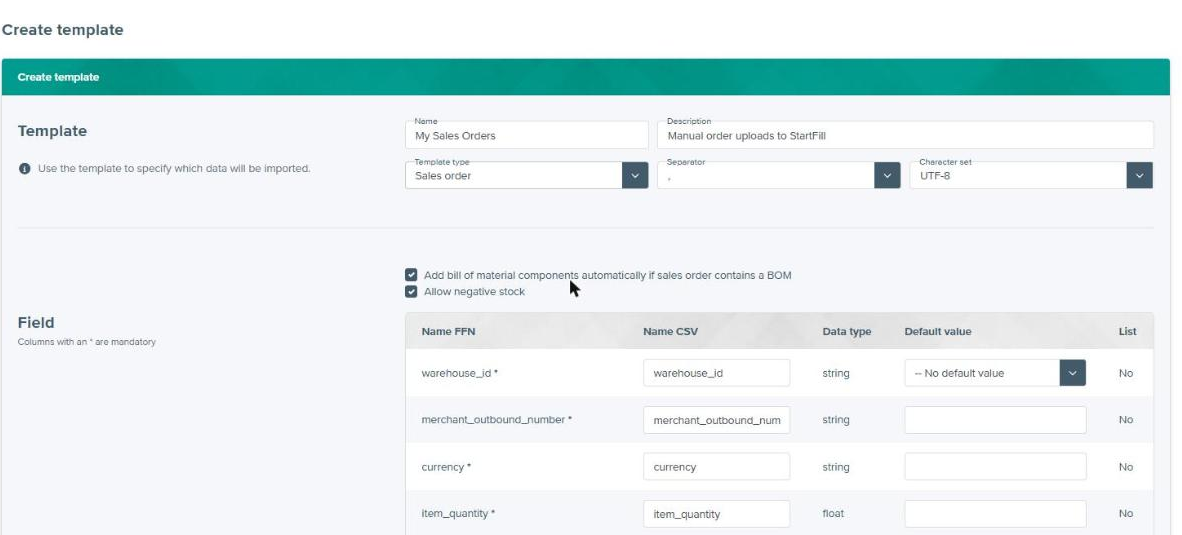
The Create template form with name, description, template type Sales order, separator comma and character set UTF-8
2 · Name it and set the format. Template type Sales order, separator , and character set UTF-8 — the three that must match the file. The field list appears as soon as you pick the type.
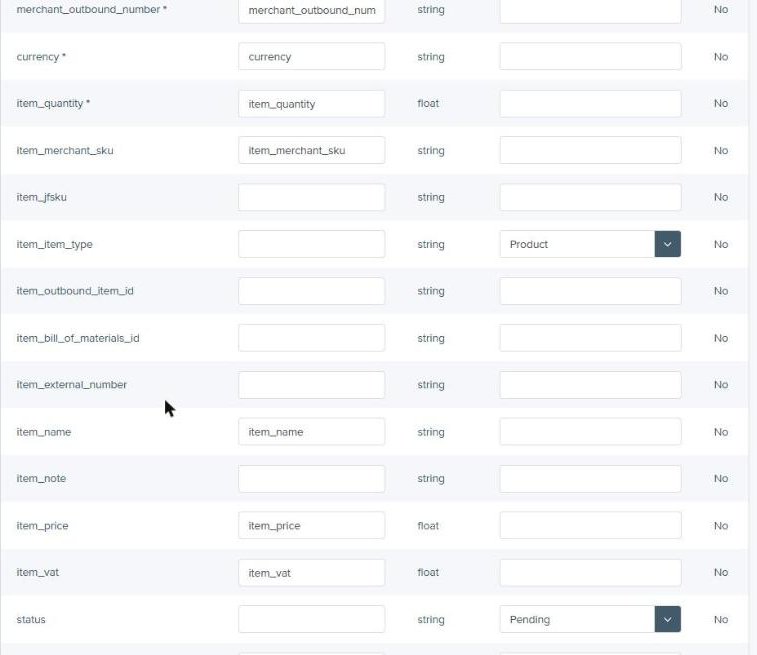
The field mapping table: FFN field names on the left, your CSV column names typed into the middle column, default values on the right
3 · Point each field at your column. Type your CSV heading into Name CSV. Our layout uses the FFN names already, so you copy each one across unchanged. Leave every field you don’t send blank. A * means mandatory. Default value fills something fixed for every row — handy for status and the item type.
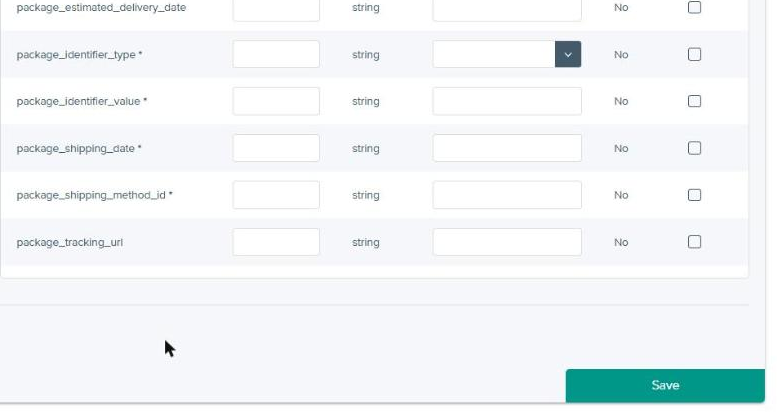
The Save button at the bottom of the Create template form
4 · Save, at the very bottom. The list is long — keep scrolling past the package fields. The template then shows up under Sales order on the overview and in the Direct import dropdown.
Adding a column later does nothing on its own. A heading that is not mapped in the template is simply ignored — no warning, no error, the data just never arrives. If you start sending a new field, open the template and map it the same day.
Or hand it to us. Give StartFill short-term access to your FFN merchant account and we will build all three templates, test them against a sample file and tell you it is done — usually the same day. Take the access away again the moment we hand back; nothing we set up depends on it, and the templates stay yours.

Step 2 · every time

Making the file

Start from one of our example files and replace the rows with your own. The headers are already the ones your template maps.

Four rules and the file will import. Save it as CSV UTF-8, comma separated (in Excel: Save as → CSV UTF-8 (comma delimited)). Write one row per product, and repeat the order columns on every row — two rows sharing a merchant_outbound_number are one parcel with two things in it, not two parcels. Every item_merchant_sku must already exist in your FFN item list. And keep the header row exactly as it comes: it is what the template matches on.

Every column, what it means and whether it is mandatory, is set out on the CSV field reference.

Every time

Running the import

Template saved, file ready — this is the bit you repeat. Four screens, about a minute once you have done it once. It is the same four whether the CSV came from us with a check run or you wrote it yourself.
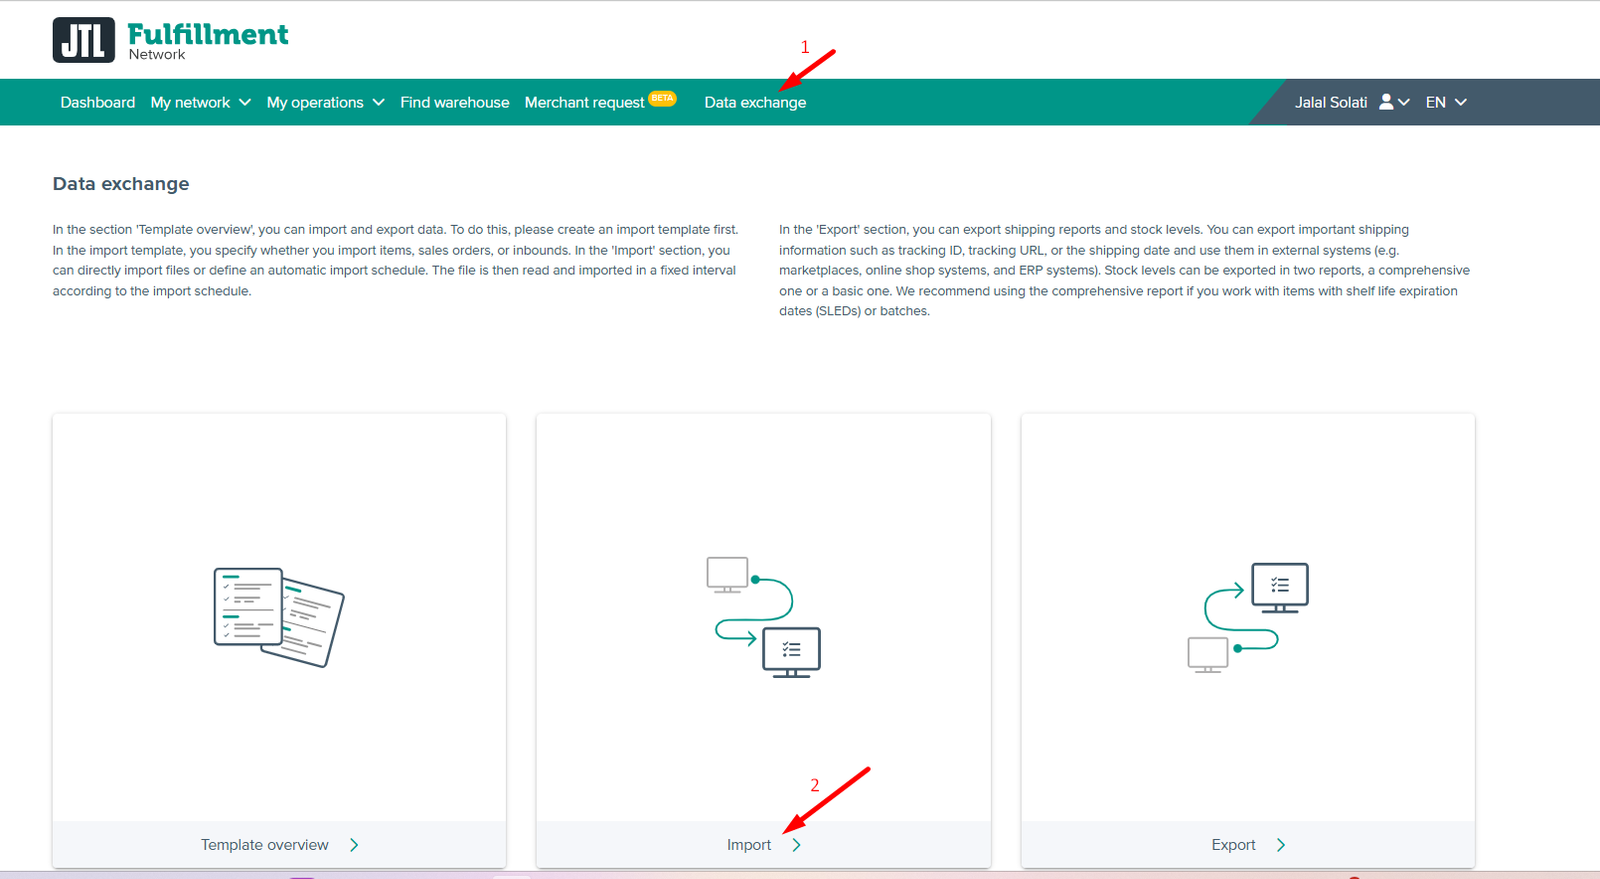
The FFN portal with Data exchange in the top menu and the Import card below
1 · Data exchange → Import. Top menu of the FFN portal, then the middle card.
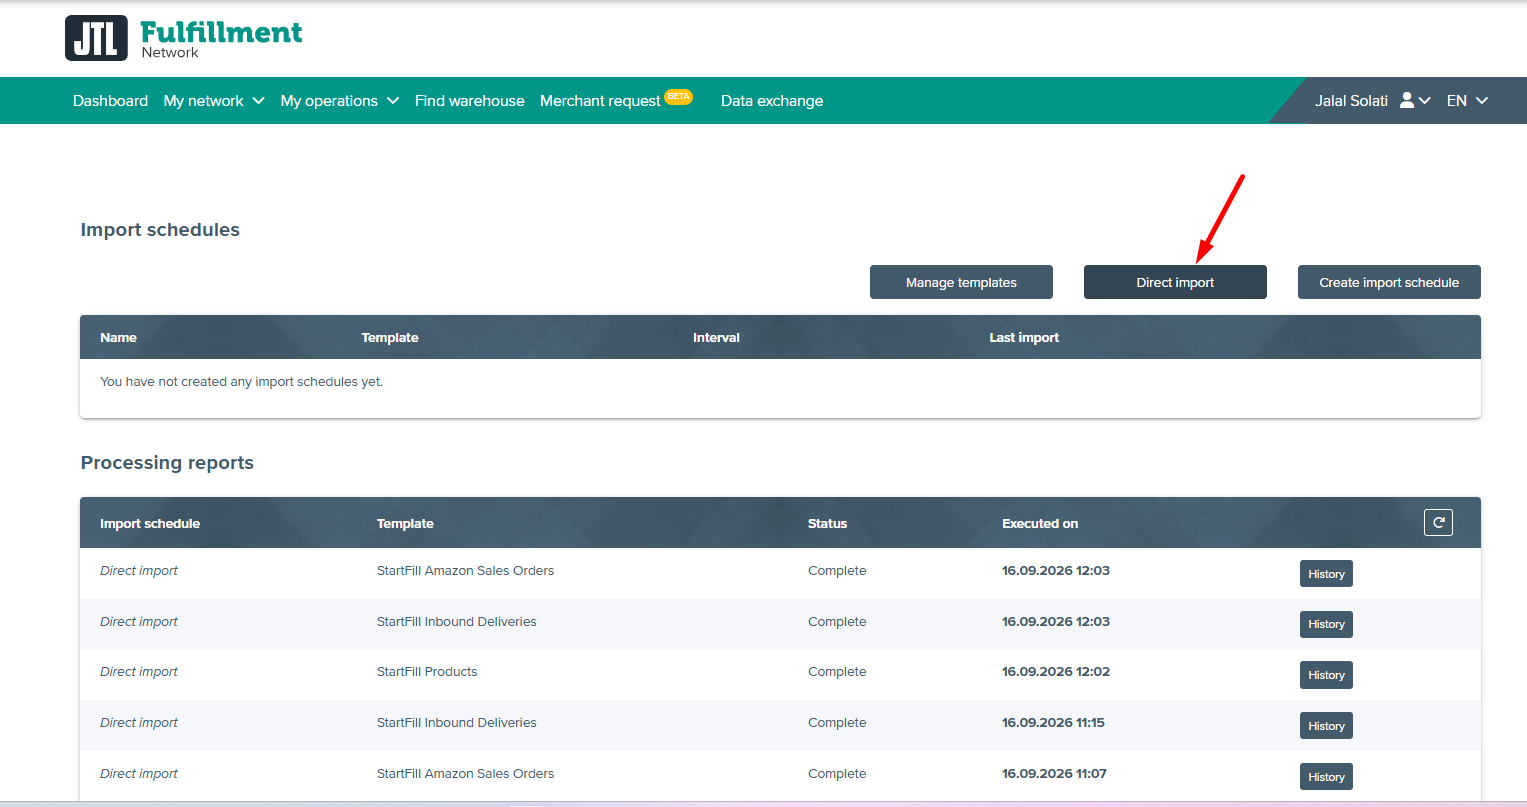
The Import schedules screen with the Direct import button highlighted
2 · Direct import. Ignore the schedules — you want the one-off import in the middle.
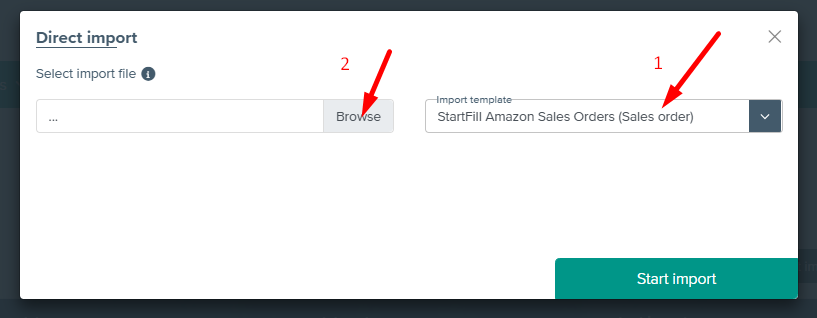
The Direct import dialog: choose the import template, then browse for the file, then Start import
3 · Template first, then the file. Pick the template that matches what you are importing — sales orders, inbound deliveries or products — then Browse and Start import.
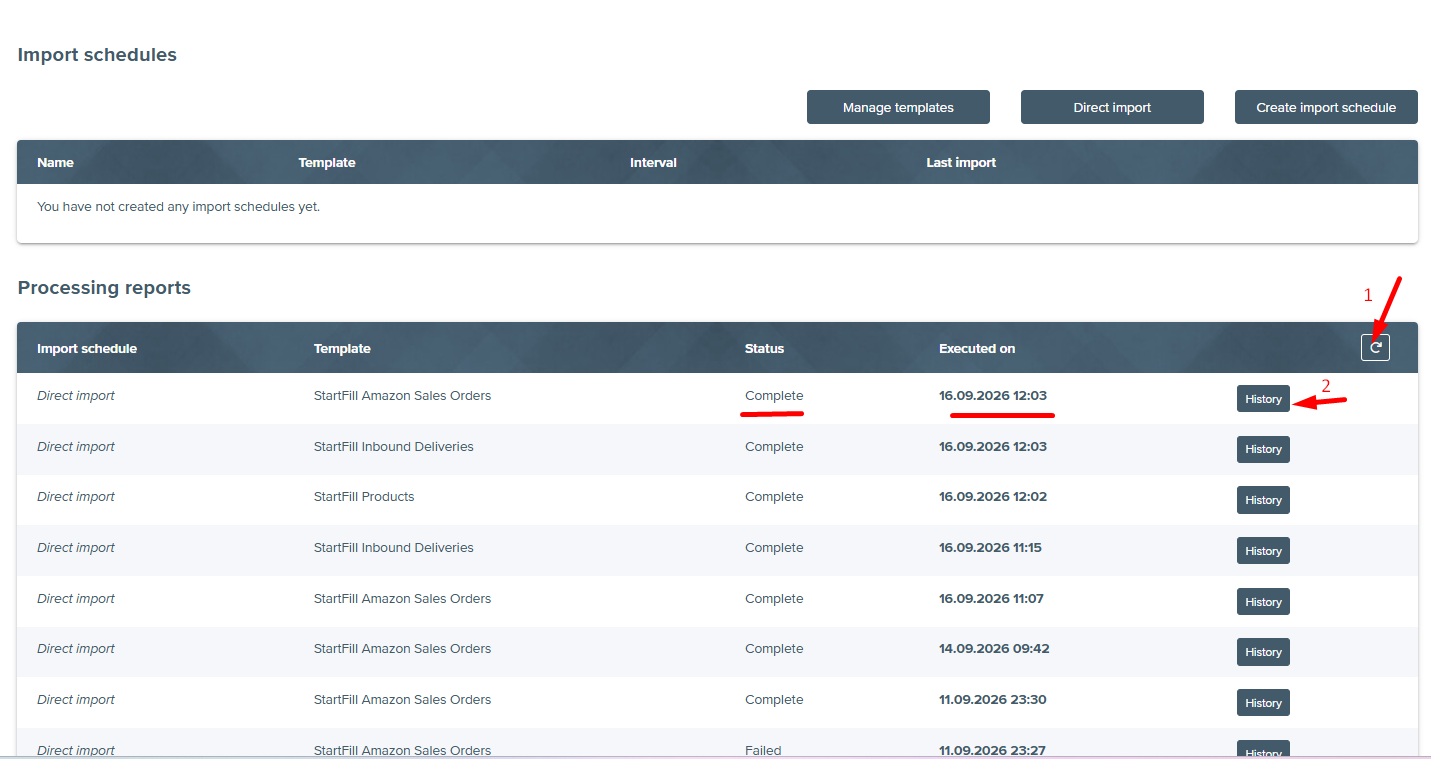
The processing reports table showing a Complete import, with the refresh button and the History button marked
4 · Check it landed. Refresh the processing reports. Complete is what you want; History tells you what a failed run tripped over.
Picking the wrong template is the usual mistake. An inbound file imported against the sales-order template does not fail loudly — it fails in the report. If the status comes back Failed, open History before trying again: it names the row and the column.
↑ Back to the top

Last updated 19 September 2026

Still stuck?

Ask us — we would rather fix it than have you guess

Onboarding help, a walkthrough on a call, or a look at an upload that did not do what you expected.